MG support
Home 5 MGHome Landline

Find Solutions

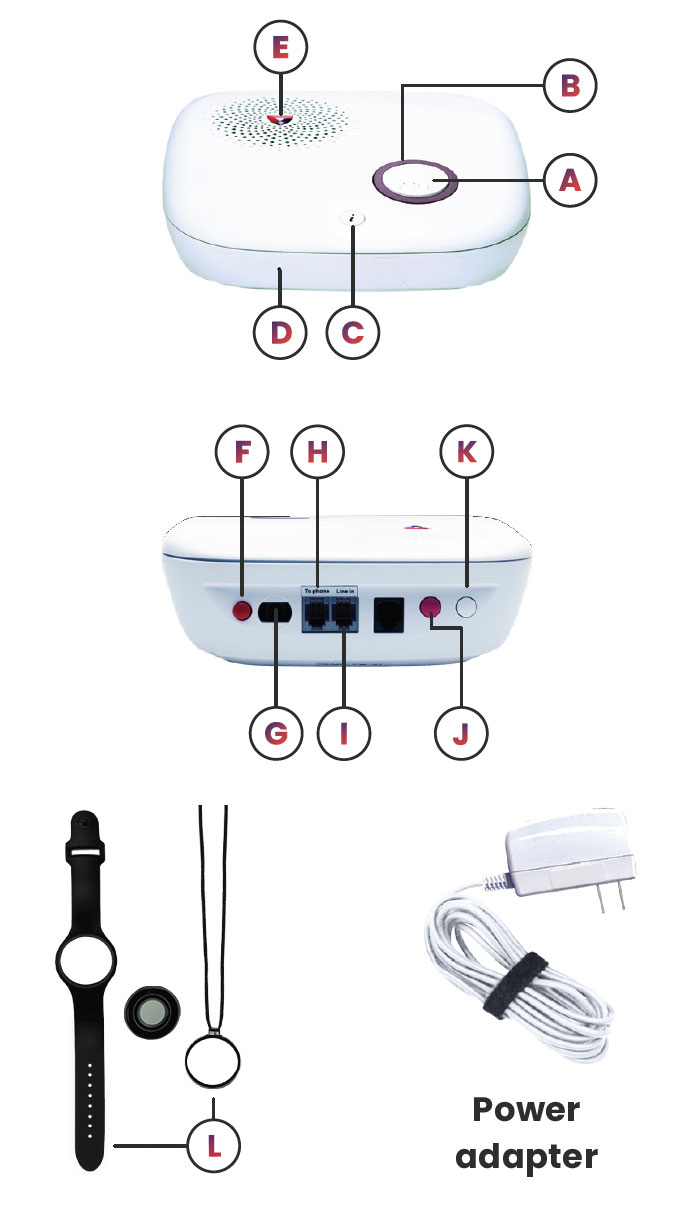
Parts Identification

A. Help button – Press to call our Monitoring Center.

B. Purple back light – Helps quickly identify the help button’s location in the dark.

C. Info button and light – The info button gives the base unit’s current power and backup battery status.

D. Microphone – This picks up voice when speaking with the emergency operator.

E. Speaker – Amplifies the sound from Monitoring Center operator when an emergency alarm has been initiated.

F. Red power button – Press the power button once to power on/off the panel.

G. AC power connector – Connects to an AC power adapter.

H. Phone jack – Telephone base unit connection.

I. Line jack – Phone line connection from wall.

J. Berry volume button – Press the button to increase or decrease volume levels. Select from levels 1 to 5.

K. White pairing button – Press this button to pair accessories.

L. Neck pendant or wristband – These waterproof, wearable peripheral buttons can be paired with the base unit and used as a help button in an emergency. Can be worn up to 1,400 feet away from the unit. 

    Set Up & Installation

    Where to place your base unit

    The base unit requires main power and a constant telephone connection and should be easily accessible. Please avoid the following — the base unit should not be placed:

    • In a damp location, such as a bathroom.
    • Close to any heat source, such as microwave ovens, which can reduce call quality.

    Please follow these steps to install your landline device to a WALL JACK:

    1. Find the main home phone wall jack. We recommend placing the base station close to the main landline telephone wall jack in your home using the provided six (6) foot phone cord.
    2. Look at the back of your base station. You will see two ports. One that says “LINE IN” and one that says “TO PHONE.”
    3. Look at the back of your home phone. You will remove the phone line from the back of your home phone. Place that cord into the “LINE IN” port on the back of your base station.
    4. The phone cord we provided will plug into the back of your phone and then into the “TO PHONE” port on the back of your base unit.
    5. Power on the base unit. Please allow for your device to display a steady green light (this may take a few seconds).
    6. Pick up the home phone to check for a dial tone.

    Please follow these steps to install your land line device to a MODEM:

    1. Find the modem the home phone is connected to. We recommend placing the base station close to the main landline telephone wall jack in your home using the provided six (6) foot phone cord.
    2. Look at the back of your base station. You will see two ports. One that says “LINE IN” and one that says “TO PHONE.”
    3. Look at the back of your home phone. You will remove the phone line from the back of your home phone. Place that cord into the “LINE IN” port on the back of your base station.
    4. The phone cord we provided will plug into the back of your phone and then into the “TO PHONE” port on the back of your base unit.
    5. Power on the base unit. Please allow your device to display a steady green light (this may take a few seconds).
    6. Pick up the home phone to check for a dial tone.

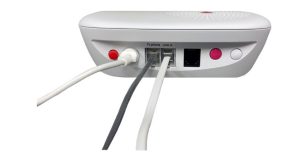
    • For wall jack installation, there should be one cord from the wall jack to “line in” on the base unit, and one cord from the home phone to “to phone” port on the base unit.
    • For modem installation, there should be one cord from modem “line/tel” to “line in” on the base unit, and one cord from the home phone, to “to phone” port on the base unit.
    How to Call for Help

    An alarm is activated by pressing the help button, which is the white button within the purple circle or a peripheral button.

    • Once a help button is pressed and held for three seconds, the base unit emits the voice prompt “Initiating help.”
    • If the alarm is activated by fall detection, the base unit will emit the voice prompt “Fall detected.”
    • You will hear 1 beep every second and the base unit will repeat “Call connected”, then “Calling the care center” before being connected to the operators.
    • An emergency operator will speak to you from the base unit.
    • The base unit will state “Call completed” when the operator disconnects.

    Cancel an accidental alarm

    Once the help button is pushed, you have 10 seconds to cancel an accidental alarm.

    • To cancel an alarm, press the help button on the base unit or the peripheral button and hold it for 5 seconds.
    • Once the alarm is canceled, your base unit will state “Call canceled.”


    Button Pairing
    1. Press and hold the white pairing button on the back of the base unit for 3 seconds. The info button will flash blue while the base unit is in pairing mode.
    2. The base unit will beep and state “Entering pairing mode, press the button on the peripheral to connect to the device.”
    3. Press and hold the peripheral button for three seconds. The base unit will state “Pairing completed, exiting learning mode.”
    Voice Prompts
    Voice prompt Condition
    Initiating help Plays when the help button is pressed to trigger emergency alarm.
    Fall detected Plays when alarm is activated by fall detection.
    Call connected Plays once when connecting to the Monitoring Center successfully.
    Call completed Plays once after 2-way call ends.
    Call canceled Plays once after pressing and holding the help button during guard time.
    On battery power Plays when panel switches to using battery power.
    On AC power Plays when panel switches to using AC power.
    Entering pairing mode, press the button on the peripheral to connect to the base unit Plays after the info button is pressed and held for 3 seconds and then released to enter pairing mode.
    Pairing completed, exiting learning mode Plays once the peripheral button has been successfully paired to the base unit.
    Exiting learning mode Plays when pairing has been initiated, but nothing has been paired and time runs out.
    Battery level good Plays when pressing the info button once shortly and released, and the battery level is above 20%.
    Battery level low, please charge your base unit Plays when pressing the info button once shortly and released, and the battery level is below 20%.
    Battery level low, please charge your base unit immediately Plays when pressing the info button once shortly and released, and the battery level is below 10%.
    Message E129 please call Customer Care Plays when pressing the info button once shortly and released, and there is device error, such as device out of order/ tamper open/low battery.
    Phone line problem; Check your connection Repeats when there is a telephone line problem.
    Phone line connection restored Played once when a telephone line problem is fixed.
    Call the care center Repeats after 2-way call is connected to the Monitoring Center successfully and until the Monitoring Center picks up the call for follow-on 2-way communication.


    Power On or Off

      Turn on your base unit

      • Plug the power adapter into a direct wall socket that is not connected to a light switch.
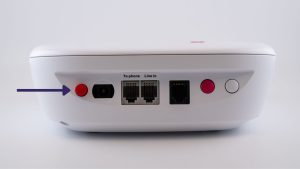
      • Press the red power button on the back of the base unit.

      To power off your device, follow the steps below:

      1. Go to your base unit.
      2. Look at the back side of the unit (where the cords are).
      3. Press the RED button near the white power cord.
      4. The berry LED will go out and means the device is powered down.
      5. If necessary, you can now safely unplug your device.

      Light Indicators
      What it means What it does
      Normal
      • The help button purple backlight will be dimly lit.
      • The Info button will be a solid green when connected to AC power.
      Running on the back-up battery
      • The info button will flash green.
      Alarm activation
      • When you press the help button, the ring around the button will light up bright purple and the info button will light up red. These lights will flash for 10 seconds, during which time the call can be canceled.
      • After 10 seconds, the cancellation window has closed, the purple help button will stop flashing and the info button light will turn solid green.
      • After the operator disconnects, the purple help button light will go back to being dimly lit and the info button will remain green.
      Pairing mode
      • The info button will flash blue every 2 seconds while in pairing mode.
      Telephone line problem
      • Info button will be solid red.
      • Important! The base unit will state “Phone line problem. Check your connection.” repeatedly until the connection is reestablished.
      Base unit low-battery alert (This is the backup battery)
      • The info button will flash red every 3 seconds.
      Device (peripheral) Peripheral button low battery/device tamper (wall buttons) /device (peripheral) Peripheral button out of range
      • Info button will flash amber every 5 seconds.
      Firmware update
      • All lights are on during firmware update.


      Product Videos