
MGMove
Find Solutions
Getting Started
Power On/Off
- Press and hold the black Sleep/Wake button for 5 seconds.
- The device will display the Medical Guardian Logo.
- Once completely powered on, the watch face will be displayed.
- Tap the power app and a 5 second countdown begins. To cancel, press cancel.
- Press and hold the black Sleep/Wake button for 20 seconds to power off and immediately reboot.
Installation & Set Up
Parts Identification
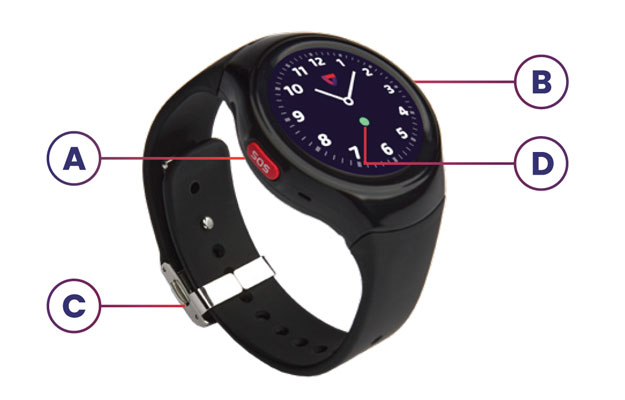
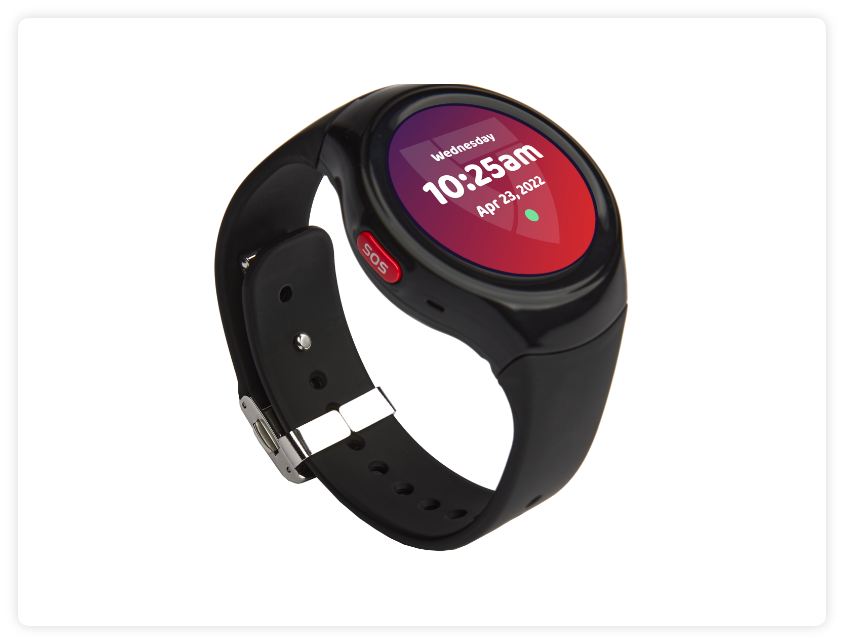
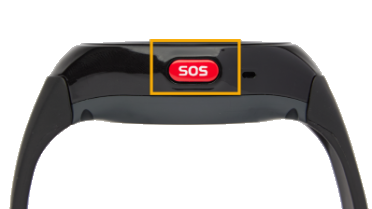
A. SOS Button (Red)
Press and hold for 5 seconds to make an emergency call. A quick press here can also be used to take you back to your previous screen.
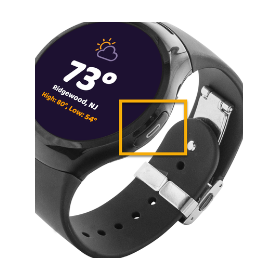
B. Sleep/Wake Button (Black)
Press and hold for 20 seconds to reboot system if needed. When the device is out of battery and placed on the charging cradle, it requires a 20 second press on this button to boot up.
C. Adjustable Wristband
The metal clasp and rubber wristband work together to provide the perfect fit. You must unlatch the wristband to charge your device.
D. Signal Dot Indicator Light
On the clock screen, there will be a dot that represents your signal strength. This will show as green (good signal), yellow (ranging from good to poor signal), or red (no signal).
Get To Know Your Buttons
The black button is a physical button on the right-hand side of the watch and serves four functions:
- Power on the watch (hold for 5 seconds)
- Wake up the watch
- Sleep mode (turn off the screen)
- Reboot (Press and hold)
Red Button
The red button is a physical button on the left-hand side of the watch and serves two main functions:
- Press and hold for five seconds to initiate an SOS Emergency alarm.
- “Back” button. Quickly press and release to exit the apps and go back to the main screen.
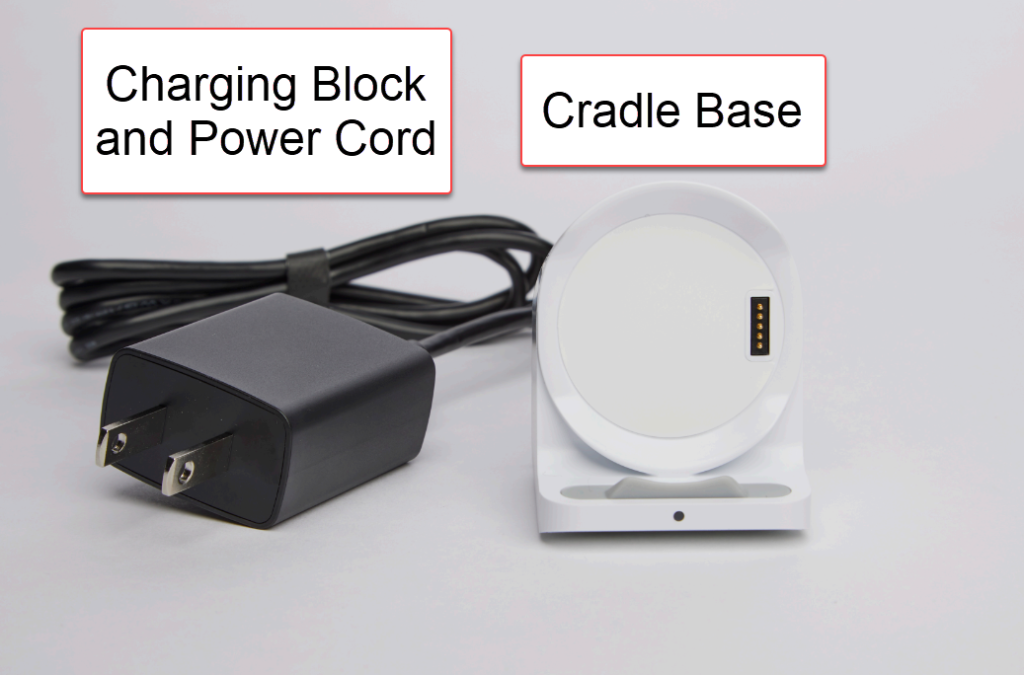
Charging
To Charge:
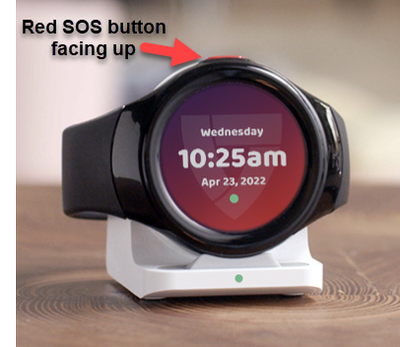
- Open up the band before placing it on the charging cradle.
- Face the Red SOS button in an upward position and align the pins on the charging cradle with the back of the watch. Be sure the device is flush with the charging cradle and making contact.
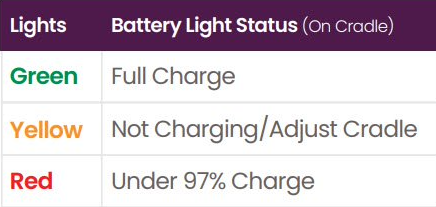
- The watch will provide an audio prompt “Device Charging” and the charging cradle will display a red LED.
- When the watch is fully charged, the charging cradle will display a green LED.
- When the watch is removed from the charging cradle the device will announce “Watch not fully charged” or “Watch fully charged” depending on the status of the device.
Apps
- Press either button (black or red button) to get to the clock screen.
- Tap on the clock screen to access the apps.
- Swipe right to access additional apps not visible on the main screen.
Main Screen
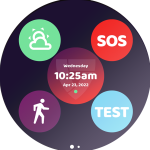
Screen 2
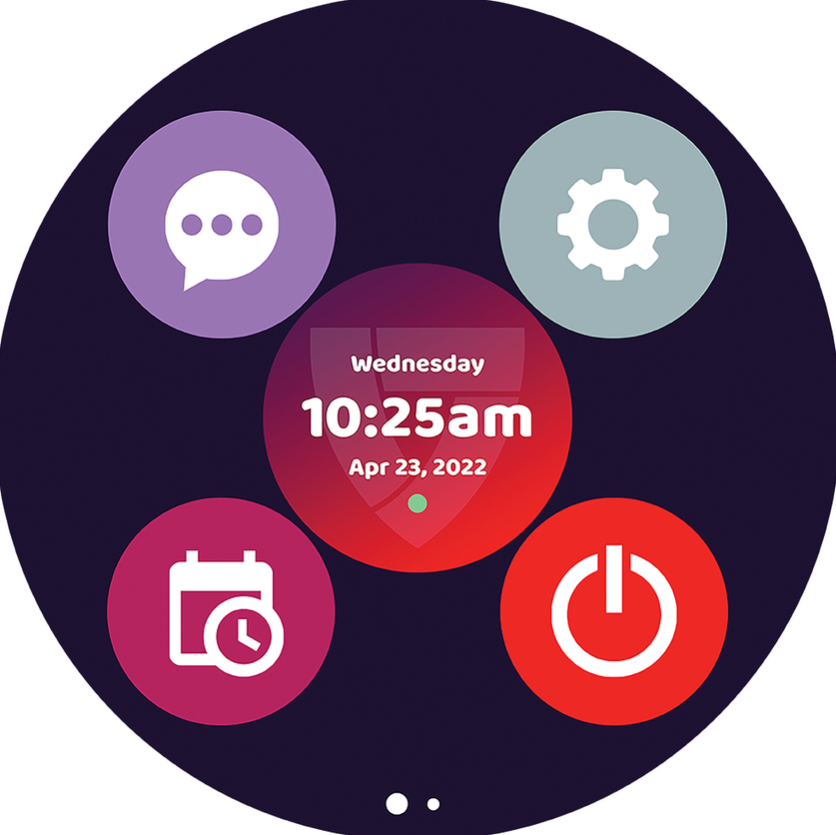
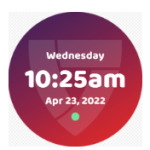
Clock Screen
- Green: Excellent
- Yellow: Good
- Red: Poor
- No Color: No Service
Weather

- Tap on the weather icon to access the location and display current weather conditions, temperature, and the high and low temperature.
- The weather app updates when it is tapped.
Step Counting
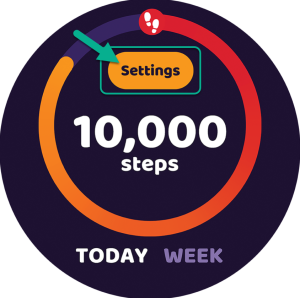
- Tap the Steps icon to access the App.
- The default screen will display how many steps the user has taken “today”.
- The “today” view will reset every night at midnight
- To view your weekly results, select “week” and scroll up to view your steps for that week.
- Press the (red) back button to get back to the main screen.
Step Counter Settings
Adjust your daily steps goal by tapping the settings icon.
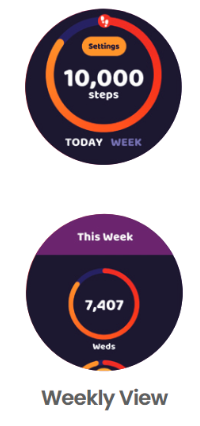
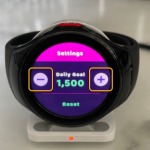
To set your goal, click on the settings button within the Steps App and tap the + or -.
- The goal will increase or decrease in increments of 100.
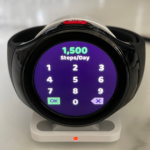
- Or you can adjust the goal by tapping directly on the daily goal number. This will load a different screen where you can enter a specific number.
- Once the goal is entered, you will need to tap on “Ok.” This will take you back to the main Steps screen.
- The reset option can be used to reset your daily steps to 0.
- Press the back button (side red button) to get back to the main screen.
Social Circle Apps
Enable Messaging and Reminders by adding on the Social Circle Apps.
Messaging
Important! In order to take advantage of the Messaging feature, an account on our MyGuardian Member Portal is required.
- Loved ones can log into their MyGuardian Member Portal to send messages to the MGMove.
- The MGMove user can send and respond to messages from the Messaging App.
Sending messages to the MGMove
- Log into your MyGuardian Member Portal.
- Click on the chat icon in the upper right hand corner.
- To start a new chat, click on the + at the bottom of the chat list.
- Choose from available contacts and click start.
- Type your message and click send.
- The watch will alert the user when a new message is received.
Responding to messages from your MyGuardian member portal
- If the MGMove user responds to or initiates a message, you can reply by logging into your MyGuardian Member Portal.
- A number badge will indicate any unread messages.
Sending/Replying from the MGMove
Replying to Incoming Messages

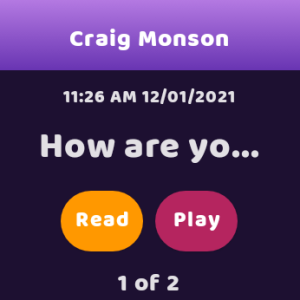
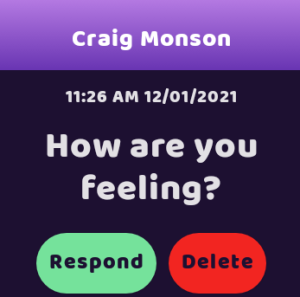
- When a message is sent to the MGMove, the watch will indicate a new message has been received.
- The MGMove user should tap on the “View Messages” icon to read or listen to the message.
- After the user had read or played the message, they can choose to respond or delete the message.
- When responding, the user can choose from one of the pre-populated responses or record a voice message.
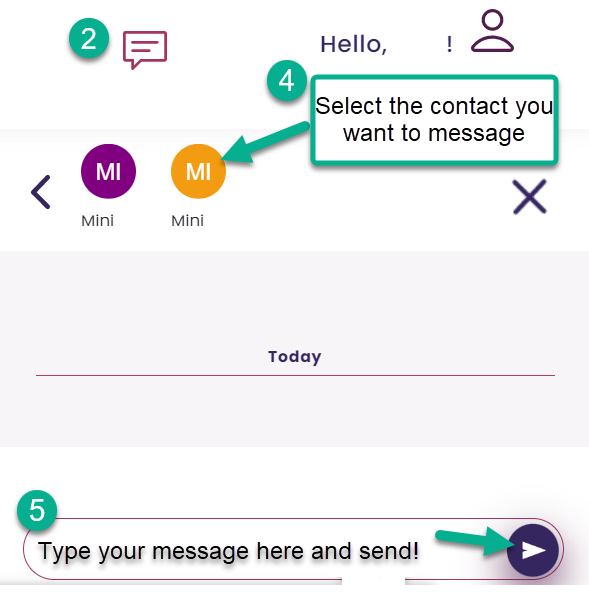
Initiating a Message from the MGMove

")
- Tap on the Messaging App.
- Select the initials of the portal user you want to message.
- The user will be able to choose from pre-populated messages or record a voice message.
- The portal user can view the message by logging into their MyGuardian Member Portal.
Reminders
Important! In order to take advantage of the Reminders feature, a MyGuardian Member Portal is required.
- Loved ones can log into their MyGuardian Member Portal to send reminders to the MGMove.
- The MGMove notifies the user of activities and reminders.
Sending Reminders to the MGMove
- Log into your MyGuardian Member Portal.
- Click on Managed Care from the left-hand side menu.
- Click on Activities and Reminders.
- You will see any previously scheduled activities and reminders.
- Click Add New to add a new activity or reminder.
- Fill in the required fields and click Submit to save.
The MGMove will notify the user at the time of the event.Receiving Activities or Reminders on the MGMove
![]()
- When a reminder or activity is due, the MGMove will receive a pop-up notification on the watch.
- The user should click on the green check box to acknowledge the reminder.
Number Badge
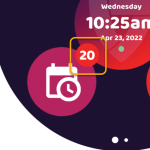
- The number badge shows the total number of activities and reminders left for the day.
- For each activity or reminder that passes, the number badge will decrease until all the events scheduled have occurred.
- If there are no activities or reminders scheduled for the day, there will be no number badge.
View the Day’s Activities or Reminders

")
- View the day’s activities or reminders by tapping on the reminder’s app.
- Once the app opens, the user will see the first scheduled reminder for that day.
- The user can scroll through the of all reminders for that day by swiping from right to left.
- The user will be able to see the reminder description, details, and the scheduled time.
- Exit the reminders by tapping on the green check mark or by a quick press of the red button.
- If there are no reminders scheduled for that day, the screen will say, “No Reminders”.
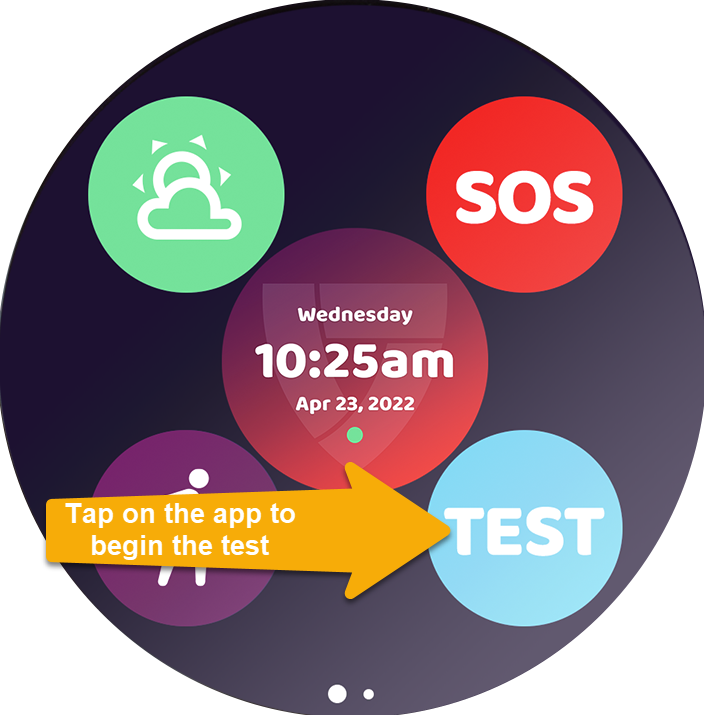
Testing Your Device
Use the Test App for your monthly test.
The Test App should be pressed at least once a month to ensure that your device is operating correctly in the event of an emergency. You can test your device with an automated recording rather than sending an actual alarm to an agent. Your device will indicate that the test call was successful.
- Press the black side button to wake up the watch. Tap on the watch face to get to the app screen.
- Press the “TEST” app on the main screen.
- Test mode will activate and display “Test in progress“.
- Once connected, the watch will announce, “Standby, connecting you to a care specialist”.
- Once the watch connects, an audio announcement will state, “Welcome to the monitoring center, to test your device please state your name”.
- State your name.
- The watch will repeat back a recording of your voice stating your name and conclude the test.
- A confirmation screen will appear indicating the test was successful, followed by an audio prompt indicating “Call ended”.
- Tap the green checkmark to go back to the main screen.
- Important! Be sure to wait at least 60 seconds between tests.
FAQs
Can The volume be raised or lowered?
No, the volume is preset by the manufacturer and cannot be adjusted.
Can I move this device to a new location?
Yes, this device can be moved to a new location anywhere in the United States where there is a 4G cell network available. The new address will need to be provided (temporary or permanent) by calling the Customer Care department or by logging into our online member portal. The device should be tested at the new address to ensure it is working properly.
Should extension cords and surge protectors be avoided?
Yes, extension cords and surge protectors can limit the amount of power the device receives resulting in the device not working properly. The charging cradle needs to be plugged directly into a wall outlet that does not operate on a light switch.
Is the mobile device water-resistant?
The portable device is water-resistant and can be splashed with water but not submerged underwater. The mobile device needs to be towel dried after contact with water. The device is IP67 Certified.
Can metal roofing/siding, trees, airports and other environmental factors have any effect on the device being able to connect?
Yes, metal roofs/siding, concrete buildings (such as a basement) and environmental factors like wooded areas can have an impact on signal strength for a device which affects the device’s ability to connect.
SOS Button & App
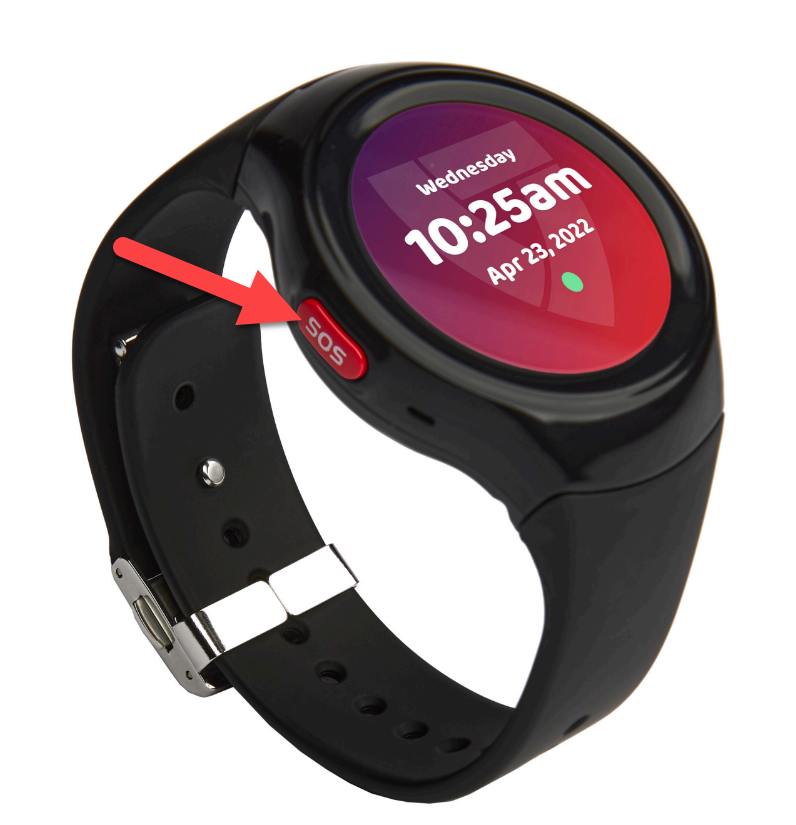
Physical Red SOS Button
- Press and hold the red SOS button for 5 seconds. The watch will state, “Hold the red SOS button for 5 seconds to call for help“.
- The watch will then state, “Calling for help. You may release the button.”
- Next, a second 5 second countdown will begin during which time you can cancel the call by tapping cancel.
- The watch will then connect with Stella.
-
- Stella is an automated testing feature that uses AI (Artificial Intelligence) and automated responses after a button press and has the capability to understand whether you need help, are testing your unit, or pressed the button accidentally and react accordingly. If you do not respond, there is a delay in your response or you cannot be understood, Stella will replay the question 1 time before transferring directly to a monitoring specialist.The purpose of using Stella as an AI response when testing is to make a smoother experience for the user, leave operators available for emergency calls and improve the response time of operators for emergency calls.
-

SOS App
- Press the black side button to wake up the watch.
- Tap on the watch face to get to the app screen.
- Tap on the SOS app. The watch will state, “Calling for help.”
- A 5 second countdown will begin during which time you can cancel the call by tapping cancel.
- The watch will then connect with Stella.