

MGMini
Find Solutions
Getting Started
Powering On & Off
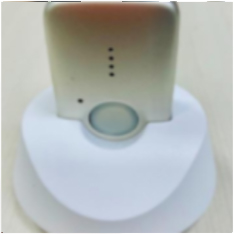
Powering on by using the charging cradle:
- Place the device in the charging cradle.
- The device will beep and state, “Device Ready” when powered on and connected to the network.
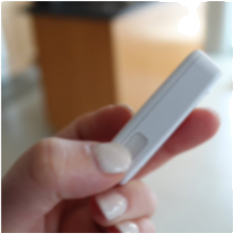
If powering on using the side Info button, not the cradle:
- Press the Info button and hold for 4 seconds.
- The device will beep and state, “Device Ready” when powered on and connected to the network.
The MGMini can also be powered off by using the side info button.
Powering off by using the side Info button:
- Push the info button 4 time or hold the info button for 4 seconds to power off the device.
- The device will beep and state, “Powering off”.
The MGMini should only be powered off if absolutely necessary.
- If the device is powered off, it cannot connect to the monitoring centers.
- The device should be powered off when troubleshooting, mailing the device back to us, when boarding a place, etc.
- Important! when performing a power cycle, wait up to 60 secounds before powering the device back on.
- MGMini’s battery life lasts up to 5 days on a full charge.
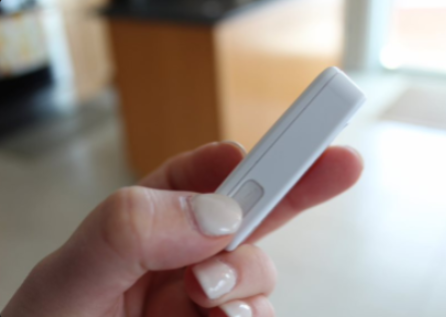
Parts Identification
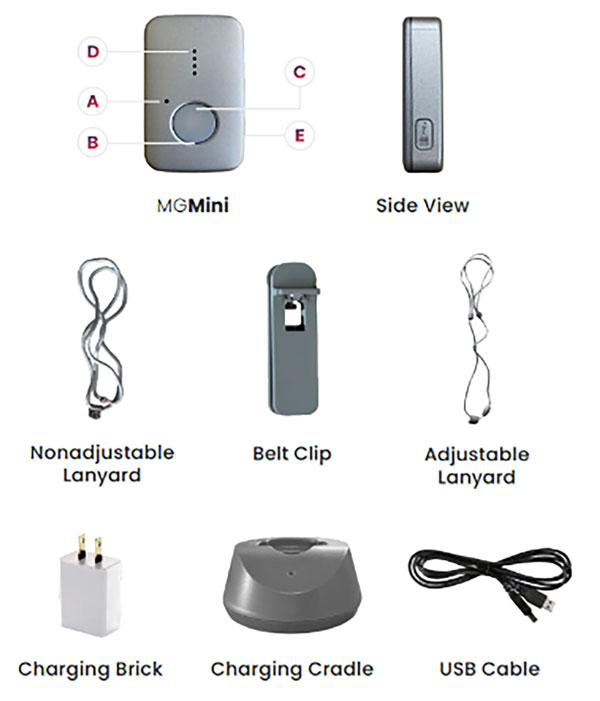
A — Microphone
The microphone allows you to talk with an emergency operator.
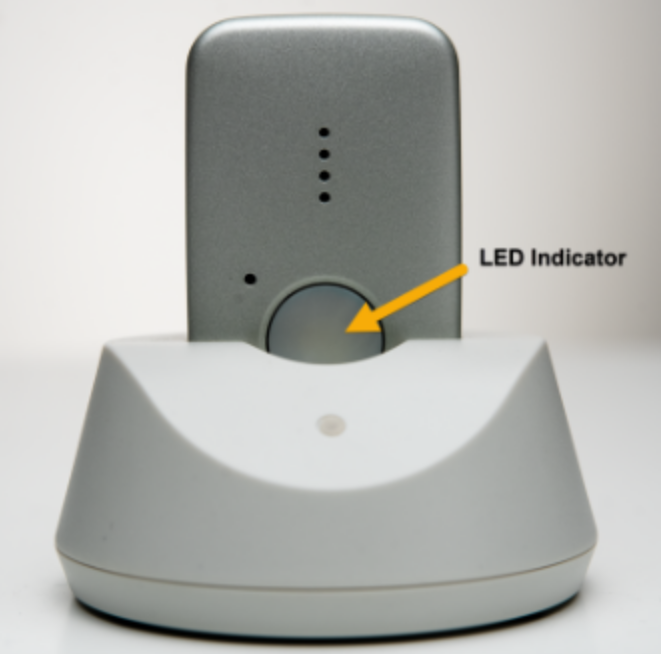
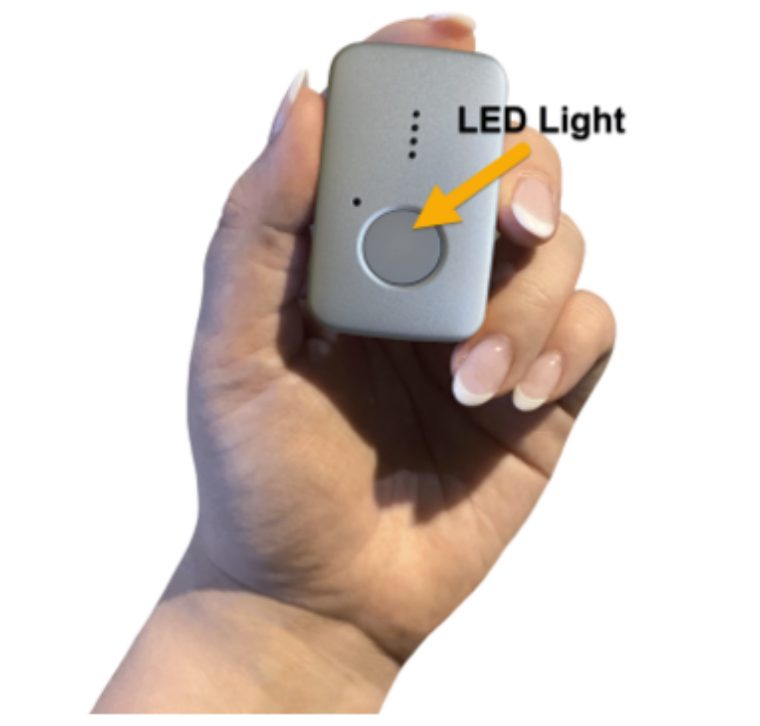
B — Light Indicator
The LED shows the battery status.
C — Help Button
Push this button in an emergency or to cancel a false alarm.
D — Speaker
This speaker amplifies the emergency operator’s voice along with any sound from the device.
E — Info Button
This button will help you use our MGMini in many ways.
Click here for a short video detailing the contents and features!
Installation

Light Indicators
Here are the light indicators to look for when your device is in the charging cradle:
- Solid red LED light
- If the device is completely drained and it shuts off, when placed in the cradle it will stay solid red until it hits 10%.
- The battery is charging.
- The light will be solid red if the battery is less than 95%.
- Solid green LED light
- Fully charged – The battery is at 95% or higher and can be removed from the cradle.
- The device is registered to the Cellular Network.
Here are the light indicators to look for when your device is out of the charging cradle:
- Flashing green LED light every minute
- Normal behavior.
- Above 20% battery life.
- Flashing red LED light every 15 seconds
- Low battery – 20% or less battery life.
- Flashing amber LED light every minute
- Issue with the network connection (loss of registration).
- Power Saver Mode – In sleep mode, if a loss of cell registration is detected during the wake period, the Amber LED will flash to indicate this loss of registration and will remain flashing until reacquired before the device returns to Power Saver Mode.
- Red, Green, Amber LED lights illuminated
- Over the air update is in progress.
OR -
When powering on the device when placed in the cradle.
- Over the air update is in progress.
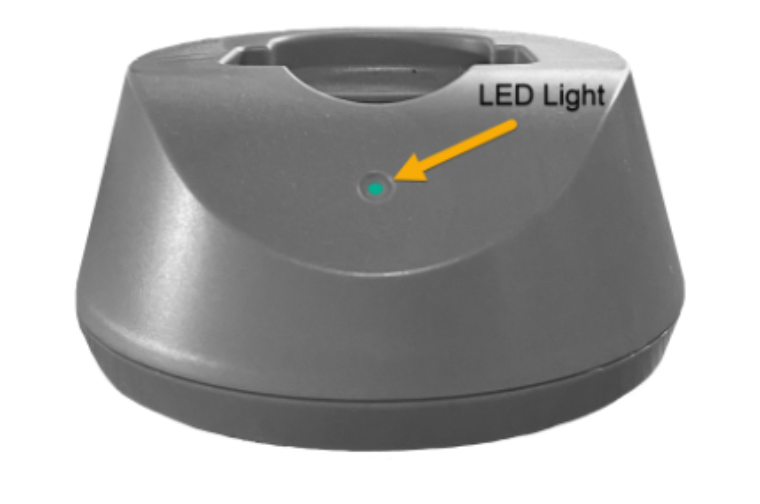
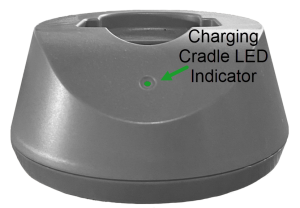
Here is the light indicator to look for on the charging cradle:
- The charging cradle will display a green LED light when connected to a power supply.
Voice Notifications
The MGMini has several voice notifications to alert the member of certain actions.
“Device Ready”
Will state when the unit successfully starts 4G/LTE connection after being powered on.
“Charging”
Will state when the unit is charging.
“Powering off”
Will state after the Info button is pressed four times.
“Initiating help. Press and hold the help button to cancel.”
Will state when the help button is pressed to trigger an alarm.
“Fall detected. Press and hold the help button to cancel”
Will state when the alarm is activated by fall detection.
“Connecting”
Will state when the alarm begins reporting after guard time expires.
“Call in progress.”
Will state once every 10 seconds during reporting while connecting to the monitoring center.
“Call connected.”
Will state when connected to the monitoring center successfully.
“Please stand by for an operator.”
Will state once every 10 seconds after connecting to the monitoring center until an operator/Stella answers.
“Call completed.”
Will state after the 2-way call ends.
“Call canceled.”
Will state once when pressing the help button for 5 seconds to cancel.
“Poor cellular connection. Please call 911.”
Will state twice if the cellular unit is bad and can’t connect to the monitoring center. 911 will need to be dialed.
“Entering Test Mode. Press the help button to connect to the test center.”
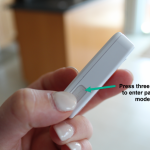
Will state when the Info button is quickly pressed twice.
“Enter pairing mode. Press the button on the peripheral to connect to the device.”
Will state when the Info button is quickly pressed three times.
“Pairing completed.”
Will state when the unit receives the signal from the peripheral to indicate is has trained the peripheral.
“Battery is very low. Please charge your device immediately.”
Add-Ons Available
Additional buttons can be added on and used with the MGMini.
Neck Pendant and Wristband Button Kits
- Neck Pendant and Wristband Button Optional (Add-on Kits include one active button and wrist band and neck pendant)
- $2.99 per month for each button kit
- Silicon band (latex-free) or Nylon cord
- Both lanyards are included in the kit, but the non-adjustable lanyard comes connected to the device.
- Black base device will have black accessories. Silver and Pearl will have grey accessories.
- Waterproof
- A Red LED indicator will flash when the button is pressed.
- Up to 5-year battery life
- A Red LED will flash after a button press if the button has a low battery.
- Every time the Active Button is pressed, the Transmitter will check the battery voltage. If a low battery is detected 3 times successively, the Transmitter will enter low battery status and transmit a Low Battery signal along with a regular signal every time the button is pressed.
- Periodically, the button will flash indicating it is still connected to the base unit.
- Press and hold the button for 5 seconds to cancel the alarm.
Fall Detection Pendant
- $10/ month
- White and dark blue button with black grey cord
- Non-magnetic pull apart
- Adjustable
- Waterproof
- A Green Indicator light will flash when pressed
- Up to 3-year battery life
- A Red LED will flash when the button has a low battery.
- Press and hold the button for 5 seconds to cancel the alarm
Voice Activated Button
- $5.00/ month as an add-on feature
- Can be powered by connecting to a DC power outlet or two C batteries (both included).
- Water-Resistant
- Two ways to activate the alarm:
- Voice Panic Detection feature: Say “Help Me, Help Me!” within a 5-second period to activate the alarm.
- Press and hold the help button for at least 2 seconds to activate the alarm.
- Voice Panic Detection feature: Say “Help Me, Help Me!” within a 5-second period to activate the alarm.
- A Blue backlight LED will flash when the signal is transmitted to the main device
- Can be mounted to a wall or flat surface.
- Up to 2-year battery life
- Amber LED flashes once every 5 seconds when a low battery is detected
Wall Button
- 2.99/month add-on feature
- Powered by one CR123A Lithium Battery (Included)
- Customer responsible to replace
- Water-Resistant
- Can be mounted to a wall or flat surface.
- Up to 15-year battery life
- A Red LED will flash after a button press if the button has a low battery.
Fall Detection
Watch this video to learn everything you need to know about Fall Detection with your MGMini!
Fall Detection can provide peace of mind knowing that our monitoring center will receive a signal to send help without the push of a button for additional $10.00 monthly.
- Fall Detection pendants contain tiny sensors that can detect changes in motion, as well as changes in the height of the pendant. If a fall is detected, the device will send an alarm to the monitoring center to begin the normal call process.
- Fall Detection works best when worn around the neck and outside of clothing.
- Fall Detection does not detect 100% of falls. If you are able, press your fall detection button in the event of an emergency. You may experience false alarms from time to time. Press and hold the button until the device says “alarm cancelled.”
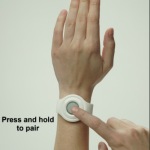
Button Pairing
- The device will state, “Entering Pairing Mode, Press the Button on the Peripheral to Connect to the Device.”
- The user should press the peripheral button for 3 seconds which will initiate a pairing signal to the unit.
- When the pairing has been completed, the device will state, “Pairing Completed.”
- The pendant has been paired to the unit and can be used to initiate an alarm.
- Test the device by pressing the button to ensure a successful pairing.
Info Button
Testing
FAQs
Can I wear the MGMini in the shower?
The device should not be submerged in water and should be towel dried after exposure to water.
Will I be protected anywhere I go with the MGMini?
Yes. Using the medical alert system’s GPS, our highly certified emergency operators can always send immediate help, whether you’re at home or on the go. The MGMini has the widest GPS coverage of any medical alert, equipped with 4G LTE connectivity.
Can I speak to an emergency operator through the MGMini?
You sure can! The MGMini comes with clear two-way audio speakers allowing you to connect to emergency operators 24/7.
How do I get protected when my device is charging?
Add a secondary pendant to your device. With a secondary wrist or neck pendant, you can connect to the MGMini while in charging mode and access emergency help with the push of a button. This secondary button does come with a $2.99 per month fee, but it is well worth the extra layer of protection. Important! The secondary button must be within 500 ft of the MGMini in order to work. The button also can still be pushed when on the charger if needed. We recommend charging nearby so you still have access to it.
Do I need to have AT&T or Verizon network service on my cellular plan in order to use my device?
Not necessary. The MGMini comes with a cellular SIM card embedded in the device and is equipped with its own service plan that all bundled into your total service costs. Enjoy nationwide coverage without needing to change your network plan.
Do I need WiFi in order to use the device?
No. The MGMini uses WiFi as a backup method for location services through a process called WiFi positioning or WiFi triangulation. WiFi positioning works by using the signals from nearby WiFi access points (APs) to determine the approximate location of a device.
Can I use this with my pacemaker?
If you have a pacemaker, it’s important to consult with your medical professional and review your pacemaker materials regarding interactions with cell phones. You should then follow the same precautions recommended in those materials for using this medical alert device.
Does the device contain magnets?
No, the MGMini does not contain any magnets. However, it does come with a non-adjustable lanyard with a stainless steel magnetic breakaway clasp and an adjustable lanyard with a non-magnetic breakaway clasp.
*No technology, including fall detection technology, works 100% of the time. If a fall occurs, you should always push your button.
*If your device does not connect properly, please contact Medical Guardian immediately.